The roof is an important structural component that protects a building from rain, snow, and wind. Brigantine Roofing is the process of installing, repairing, or replacing this outer layer.
The right roofing materials balance aesthetics and durability with cost and maintenance requirements. Look for regional styles that complement your home’s design, and consider sustainability factors like green roofs. Check local regulations and homeowners’ association guidelines to ensure your chosen material complies with community standards.
The materials used in roofing are not only a factor in the overall cost of the roof but also how durable and attractive it will be. Different roofing materials provide different advantages and are best suited for specific climates, so homeowners need to carefully weigh the pros and cons of each before selecting a material.
Asphalt shingles are the most common roofing materials and work well with many different home styles. They come in multiple styles including the basic 3-tab shingles and dimensional or architectural shingles. Some shingles even mimic the look of other roofing materials like slate and cedar shakes.
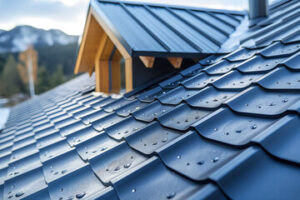
Metal is another popular roofing material. It is long-lasting, energy efficient and provides excellent protection against the elements. There are several types of metal roofing materials including copper, steel and zinc alloys. Zinc and steel alloys are available in a variety of finishes from galvanized to galvalume. Copper is highly recyclable and is often used in decorative architectural features on roofs and wall flashings.
Another option is membrane roofing which uses a synthetic rubber sheet such as EPDM or TPO. These membranes are glued to a roof deck and offer water and debris resistance. They are an economical choice for flat and low-pitched roofs.
Concrete shingles are another option for residential roofing. They are a durable, stylish and affordable option that can be made to imitate the look of other roofing materials. They are especially well suited for homes in climates with frequent heavy rain or snow because they can resist the impact of hail and other extreme weather conditions.
Clay tiles were once a very popular roofing material in southern Europe and give a classic terracotta look to a home. However, they are quite heavy and may place too much stress on a structure that is not designed for this type of load.
Slate is a natural roofing material that offers an elegant, stately look to a home. It requires a specialist to install and can be expensive. It is also one of the most durable roofing materials and will last for centuries, but it is very heavy so it is not suitable for all structures.
Installation
A roof is the outermost covering of a building or structure that protects it from rain, snow, sunlight, and other weather elements. Roofing is the process of installing or replacing this outer layer. It includes a variety of materials, tools, and techniques. Some common roofing materials are shingles, tiles, and metal panels. The process of roofing can also include insulation and ventilation.
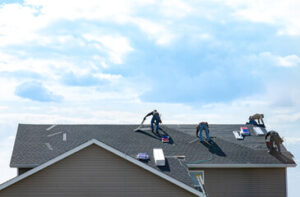
During the installation process, our roofing contractors will first inspect your current roof to determine the extent of damage and what needs to be done to repair it. They will then provide you with a comprehensive estimate that includes details about the costs and what work will be completed. During this time, our project manager will go over the estimate with you to ensure that it is in line with your budget and that you understand all of the terms and conditions.
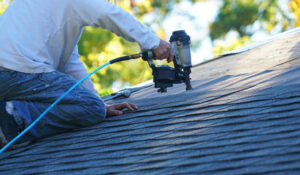
Once the estimate is approved, we will schedule the work to be completed. Our team of experienced roofers will remove your existing roofing and install the new one. They will use a variety of tools, including hammers, nail guns, ladders, shingle cutters, and ladder stands. After the installation is complete, they will conduct a final inspection to ensure that the roof meets all industry standards and manufacturer specifications. They will also verify that the proper ventilation and insulation were installed.
Maintenance
The roof is a vital part of any building, shielding interior spaces and the people and possessions beneath it from harsh elements. Proper maintenance can extend the lifespan of roofing materials, reduce energy costs, and preserve the integrity of a building’s structure.
The most important part of roof maintenance is preventing leaks. A leaking roof is expensive, both in the cost of repairs and the damage caused to interior structures and contents by water intrusion. According to the National Roofing Contractors Association (NRCA), approximately 80% of all roof leak occurrences are a result of poor maintenance.
A regular inspection of the roof can detect early problems and allow for prompt repair. In addition to looking for shingle wear and tear, you should also look for areas where the caulking or flashing is deteriorating. The flashing around chimneys, vent pipes, skylights, and roof hatches is especially vulnerable to moisture. It is also a good idea to inspect any other roof penetrations for signs of deterioration or leakage, including air conditioning units, exhaust fans, and vents.
Performing preventive maintenance at the change of each season is a wise way to extend the life of your roofing materials. As summer winds down, it is a good idea to clear the attic of any fallen leaves and debris, as well as gutters and downspouts. It is also a good idea to trim any overhanging tree branches. These can snag on storm-driven debris and cause damage. It is also a good idea to perform an annual chimney inspection, as creosote buildup can cause fires and carbon monoxide leaks.
During the winter, you should also check for ice dams and snow buildup, which can break off shingles and lead to moisture damage and leaks. You should also inspect the ventilation of your attic to ensure that condensation is properly vented and does not weaken the shingles or roof membrane. A regular chimney inspection can help to avoid dangerous and costly chimney fires. Ventilation inspections can also identify and address any issues with attic insulation and ducting. It is a good idea to perform these inspections prior to any severe winter storms.
Repairs
Repairing roofing can involve a variety of tasks, such as replacing missing shingles, patching leaks and addressing structural damage. A qualified roofing contractor can inspect the structure of the roof and make recommendations for repair work. Depending on the extent of the damage, it may be necessary to remove existing shingles and install new ones with the appropriate underlayment. In some cases, specialized flashing or sealants are required to prevent water infiltration.
A damaged roof is more than just an eyesore – it can also lead to interior damage and compromise your home’s energy efficiency. Leaks can rot the underlayment and wooden beams, and cause mold growth that affects indoor air quality. In addition, a leaking roof can impact insulation and increase heating and cooling costs.
Leaks can be caused by a number of factors, including worn out or improperly installed shingles, cracked vent pipes and deteriorated sealant around chimneys, skylights and other roof penetrations. In these cases, repair involves identifying the source of the leak and applying a suitable patching material.
In some cases, the underlayment of the roof needs to be replaced, which can be expensive. However, this is essential for ensuring a watertight protective layer over the interior of the house.
While repair is typically less expensive than a complete replacement, it’s important to consider the long-term cost. If your roof has a lot of repairs and you’re in an area with strong winds, it may be more economical to invest in a full replacement that future-proofs the structure for harsh weather conditions.
In addition, if you’re planning to sell your home soon, a new roof with resilient materials can help you recoup your investment and impress prospective buyers. Repaired areas can look patchy on complex roofs with lots of angles, valleys and custom features, while a complete tear-off replacement seamlessly blends the new with the old shingles.