Whether you’re re-roofing a new home or renovating an existing roof, there are many decisions to be made. Choosing the right roofing materials can have a big impact on your budget, climate and aesthetics.
The first step is to prepare your property. Protect landscaping, bushes and movable sculptures with tarps and position garbage cans to catch falling nails. Contact Corpus Christi Roofing CO for professional help.
If you’re a homeowner planning to have your roof replaced, it’s best to prepare as much as possible ahead of time. This will make the project go more smoothly and ensure that your belongings are safe from damage during the process.
Start by removing anything that may obstruct the roofing crew. This includes vehicles, patio furniture and other yard decorations. Clearing the area also allows the crew to move more easily around your home.
Also, it’s important to clear out the attic. Even conscientious roofers will kick up dust during the replacement, and this can damage items stored in your attic. You should remove any items from shelves or walls, and consider relocating any fragile or family heirlooms to a safer place.
The next step is to lay down underlayment and felt paper on your roof’s valleys. These areas form a V shape at the edges of your roof and are highly vulnerable to leaks. Waterproofing these areas helps prevent damage from rain and snow.
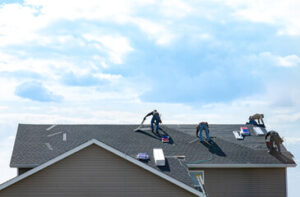
Once the underlayment and felt have been put down, the roofer can begin hammering the shingles into place. Depending on your roofing material choice, this can take a day or two to complete the installation. It’s important to start the work early in the day to avoid overheating or damaging the materials.
Finally, it’s important to protect your children and pets from the noise and chaos of a roofing project. Naps will be interrupted and outside playtime will be limited. It’s best to arrange for children to stay at Grandma’s or a friend’s house while the work is being done. Pets should be kept in a safe, quiet room away from the construction zone.
Materials
The materials used for roofing installation are a significant factor in the overall cost and effectiveness of your roof. Premium materials can offer increased energy efficiency and lifespan while reducing maintenance needs. These benefits make investing in the best quality materials for your home a smart financial decision.
A variety of roofing materials are available, ranging from asphalt shingles to clay tiles and stone slates. Each has its own benefits and drawbacks, depending on your specific needs. Assessing your environment, native climate and budget will help you decide which option is right for your home.
In addition to the shingles and underlayment, roof sheathing is another essential element of any roofing project. This wood foundation layer supports the shingles and provides a stable base for your roof coverings. During roof installation, contractors often need to cut through the sheathing to install the shingles and other roof materials. Having the proper tools for this type of work can help speed things up and ensure safety.
One tool that’s necessary for any roofing job is a chalk line. This handy device snaps a straight line that’s perfect for marking open valleys or aligning gutters. You can also use a metal measuring tape or a high-tech laser to mark lines for roofing.
Roofing toe boards or roof brackets are also helpful tools on steeply pitched roofs. These 2-by-4-inch boards screw to the rafters or trusses and provide footing on the roof. Without them, it’s dangerous to climb on a roof for maintenance and repairs. They also allow you to easily access a roof’s eaves and gutters. For these reasons, toe boards are an excellent choice for homeowners who wish to undertake roofing projects themselves.
Installing the Shingles
To protect your roof from the elements and keep it watertight, the next step is to lay asphalt, felt-paper or a special waterproof underlayment. This is nailed to the roof, and overlaps the previous course of shingles by about an inch. It’s important to do this correctly, as if it isn’t done properly, the next shingle course will leak.
After the underlayment is laid, the shingle installers can start laying the first shingle course. This begins at the bottom edge of the roof and overlapping the drip edge. It’s nailed in place with four roofing nails or more as instructed by the shingle package, and it should be offset from the row above. This helps prevent rain from pooling behind the shingle.
As the course goes up, a nail is placed every six inches along the gutter, and another every 12 inches. This ensures the shingles are secure and allows for proper water drainage. As each shingle is nailed, a tab of the adjacent shingle should be bent down over it. This is known as a “butt nail” and it helps to prevent leaks.
The next few courses of shingles are laid in a basic pattern across the roof. The shingles are secured with four nails each, or more as specified by the shingle package (and up to 6 in high wind areas). Between each shingle course, it’s necessary to lay flashing around plumbing stacks and vents. Also, any roof planes that butt against vertical walls should be covered with metal step flashing. This will help prevent water from getting into the house at those points. Also, a standard alum drip edge is installed at the roof perimeter.
Flashing
Flashing is a thin material (usually metal) that professional roofers use to close any gaps where roof materials meet walls or other structures, such as chimneys and skylights. It is designed to direct rain away from critical areas where a gap could create water leaks. This is particularly important in roof valleys, where the sloping roof meets a vertical structure like a wall or dormer, and around vents, chimneys and skylights.
There are many types of flashing. The most common are channel, apron, valley and counter flashing. The type of flashing used depends on the location and the nature of the project. Roofing professionals often apply a layer of sealant to the area before installing the flashing, to help ensure that it is watertight.
A channel flashing is shaped like a “U” and covers the area where the wall of the house meets the sloping roof (either to deflect water or protect a shingle). Apron flashing, which is rectangular and set at a 90-degree angle, protects the joint between a wall and the top of a dormer feature. Valley flashing protects the area where two different roof sections meet, directing rainwater run-off away from the roof. Roll-top ridge flashing protects the ridge (or high point) of the roof, while flat ridge flashing is similar to rolling-top flashing but has a flatter ridge.
Sill flashing is concealed flashing installed above doors and windows to prevent rain from entering the walls. It is typically made from stainless steel or aluminum, and it is designed to bridge the gap between the first piece of step flashing and the gutter. Kickout flashing is also installed to cover the gap between where the first piece of step flashing ends and where the gutter begins.
Capping the Ridge
In addition to blocking water, snow, and debris from the ridge line, a well-installed cap also enhances the appearance of the roof. There are two types of ridge caps available: closed and vented. Closed ridge caps are fully sealed and provide excellent weather protection. Vented ridge caps allow for the installation of profile vents and offer a more attractive finish.
Whether you’re installing a vented or closed ridge cap, it’s important to follow the manufacturer’s instructions when laying the cap. Start at one end of the ridge line and mark a chalk line 6″ from both edges. This will ensure that you have a clean professional-looking finished product. Once the lines are drawn, it’s time to install the first piece of ridge cap. Using the chalk lines as guidelines, set the cap so it overhangs the roof ridge by about 1″.
Nail down each side of the ridge cap and use the appropriate nails to secure it to the metal roofing panels. Be sure to use galvanized roofing nails so they won’t rust or discolor over time.
When the ridge cap is fully in place, check for any gaps and leaks. If there are any gaps, seal them with a quality silicone caulking or mastic.
If you’re installing a vented ridge cap, it’s now time to add the profile vent. Starting at the gable trim, place the anchor clip so that it extends back 1″ behind the mark you made on the rib peak of the panel. Then, thread the profile vent through the anchor clips and screw it down.